
I acquired this piece of marble from Mt. Calder on Prince of Wales island in S. E. Alaska, working together with Gary Williams. I have two others left after I sold 4 or 5 to Don Wilson, a Portland based sculptor. I knew it would be the finest white marble I would ever have to work with. I did not know about its integrity since all this stone was blasted 75 years ago. So I began by hand pitching the edges, inspecting for seams and letting water dry on the surface looking for future trouble. I inspected for variations in color or mottling spots. I still had no specific idea in mind.
 |
| Back right view |
It was quite flawed and pointed on top and looked narrow on back right side to do much with. I could see a seam on this side as well – that bothered me. So I cut the top, losing as little stone as possible, and removed stone to check out seam.

 |
| Front and back |
I decided on David mainly because it would probably be a once-in-a-lifetime chance for me even though the right-hand side of the stone looked skimpy. I then made three sketches front left and right to help me envision the general shape and proportions. I conceived of throwing the right leg out, steeping into combat and allowing development of leg muscles, and the right arm cocked with a sling since I had enough mass there . The natural sway of the back would work to my benefit. Notice the center line front and back. It's so easy to lose your proportions in figurative art, that’s what makes it so hard to do.
 |
| At this point I decided to make a drawing of what I thought the stone could be. |
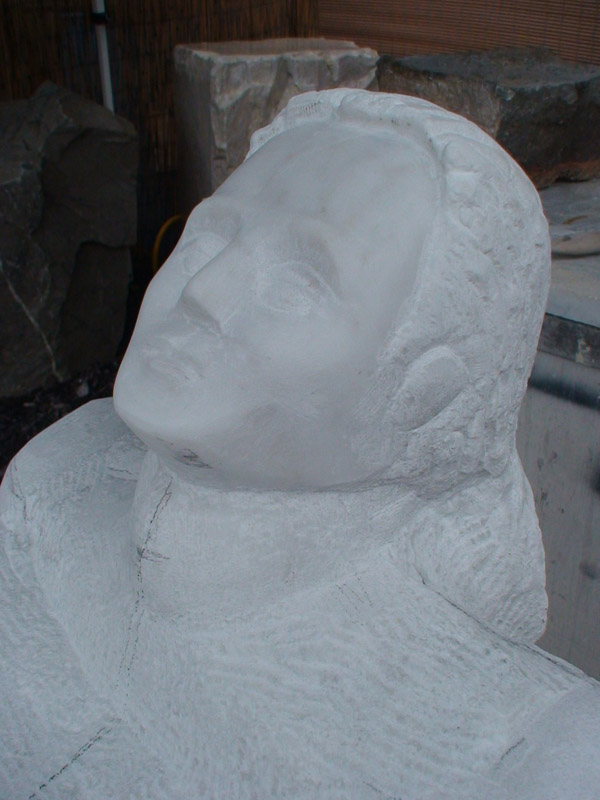
I knew material was lacking and wanted as much body as the stone would give, at a decent scale that pleased me. By tilting the head up, all proportions coming from the head, allowed me maximum body size, and of course David should be looking up at the giant.
 |
| Head materializing |
I use proportions that use head size to determine all critical locations on the human form – a proven system that works. The widest point at David's strong shoulders was determined to be 13 inches. His face was to be a young strong man almost still a boy. Note direct sketch on side showing back shape. I wanted a twisted or curling shape suggesting body torque, ready to unravel. Right shoulder lowers, body cocked for action.

With there not being much stock on the right-hand side and a menacing seam staring at me I knew this was not going to be easy. Not many sculptors are wealthy enough to have lots of stone. Even Michelangelo's David's form was altered by lack of material. Stone sculpture is not like modeling where you just add more clay to add material. The stone sculpture is in a constant dialog with his material. Often fearful of failure, unless he is a fool.

By tilting the head I could get a six-and-one-half inch head and with cleaning up front and back of the stone I was able to lay out theoretical chin normal location giving me the breast plate at six-and-one-half inches and waist at thirteen inches . That would leave a good amount of stone for leg development. I wanted more but this would have to do in order for me to get a scale that pleased me.

Lacking confidence in my ability to carve a head made me want to do it first. If I failed at this end ever all else would be a wasted effort. I managed to get a boyish head but kept the hair long in back for strength to be removed later.


Being satisfied with the head, I undercut the neck and defined his shoulders. (Note lack of stone on the right hand side.) This dilemma made me put the lower half of right hand lower body back allowing left hand side of sculptor to charge forward providing body torque the David needed to have. It all worked out for the best as often happens with problems.
 |
This photo shows finished sculptor body torque
|


I decided to work on the right hand arm first since the seam was there, I could see how to deal with it. Getting a good sized arm here may be a challenge. I knew there was plenty of stock on the opposite side and that I would have many choices on arm and hand shape. I located the arm by pushing it back, which allowed me to cut in the back enough to get sufficient stone to cut in generous buttocks. Now for the first time, I could see that the sculpture was going to work if I continued to keep proper proportions. The left hand side could push forward leaving room for bent right arm holding a sling, ready for action.
 |
| Finding arms, chest, and waist all by measurement. |
 |
| Further defining back, arms, and legs. |
 |
| Defining right hand arm, hand, and waist location. |
 |
| Same with left arm. |

 |
| It's beginning to look like art. |

 |
| The basic form is completed. |


I wanted big hands somewhat larger than his penis, only suggested under the loin cover. I once had a art conjurer customer tell me a fireplace design I proposed to him seemed to contrived. Yes, art isn’t fluff falling from the sky, it's very contrived, thank you. I could now cut in his front legs from frontal position, pushing left hand leg forward as planned.

I carefully tipped him on his side not really knowing its balance points yet, and cut in left hand arm and sling resting on his leg.

For the first time I could stand my David up on my work bench, by leaving sufficient stone mass on bottom. This allowed me to work all around the stone at a comfortable height and align critical measurements up by measurement from work table. Both front and back could now be aligned for the first time with ease.


 |
| Refining details, opening arm cavities etc. |

 |
| I put sculpture back down to further detail back muscles and form strong legs, then drill hole for pinning. |


I am glad I pinned him for he falls backward quite easy . I set him on a block of limestone I had, not a perfect perch but about the right height I think. This is something I am not very good at. I have entered my David in several public art-on-the-street proposals but it was never accepted. Figurative art is not much appreciated in this country. It has been sitting in my stone yard, remnant slab yard now for two years, has probably been seen by 500 or more Oregonians of all types. There has never been one comment since I placed it there. I think that says something, I don’t know what. I am quite sure if I put a wooden totem pole out there, crowds would gather and rave. But I am not going to.
Addendum:
I worked on this sculpture mostly during the cold season in Portland, Oregon, outside on an average of 3 hours a day for about 2 1/2 months. The weather didn't bother me because I was excited about doing the project!
Hats off to you Joseph.
ReplyDeleteJust one question how much time it take to complete.